


KVM port on ARM Cortex-A15 Fast Models
A step by step guide for linux kvm virtualization on embedded systems
This KVM-on-ARM guide is a step by step tutorial to showcase linux KVM virtualization on embedded systems and ARM based servers, starting with KVM porting on ARM Cortex-A15 and big.LITTLE Fast Models. It helps to discover how to setup the development environment for KVM development on embedded multi-core architecture processors. This guide is part of the Virtual Open Systems collection of virtualization technical guides.
Introduction
In the last decade virtualization has been established as a very powerful tool, expanding the capabilities of servers and enabling disruptive technologies like cloud computing. At the same time, virtualization has also been proven as a powerful tool for end users, system administrators, security researchers, and system developers. Virtualization has only started to show its capabilities on mobile and embedded platforms, however likewise to the desktop and server world, a very wide range of new use cases can be supported.
The Linux Kernel Virtual Machine (Linux KVM) is one of the most successful and powerful Virtualization solutions available, enabling the Linux kernel to boot guest Operating Systems under a process. Linux KVM has been designed to be portable, and has proven itself in a number of architectures, like Intel VT-x, AMD SVM, PowerPC and IA64, and is now implemented for the ARM Cortex-A15 and Cortex-A7 platforms.
This document describes how to set up a development environment for KVM/ARM on Cortex-A15. A working recent Linux system is assumed to be used by the user for development. The instructions provided assume an installation of a recent version of Ubuntu (13.10 at the time of this writing), but could be adjusted for other modern distributions. After following this guide the user will be able to boot a Cortex-A15 simulation platform, with a working KVM virtualization setup able to boot a Linux guest.
This document will guide the reader through a number of steps in order to setup the development environment for KVM development on Cortex-A15:
 Installation and setup of the simulation platform. We will use the ARM Fast Models platform to generate a Cortex-A15 environment.
Setup of a host ARM Linux system. We will compile an ARM Linux kernel which we can boot on our simulation platform; we will use a basic file system image to boot a working system.
Build KVM and QEMU on our setup. We will enable KVM support in the host Linux kernel, and built QEMU with KVM/ARM support in order to boot a guest system.
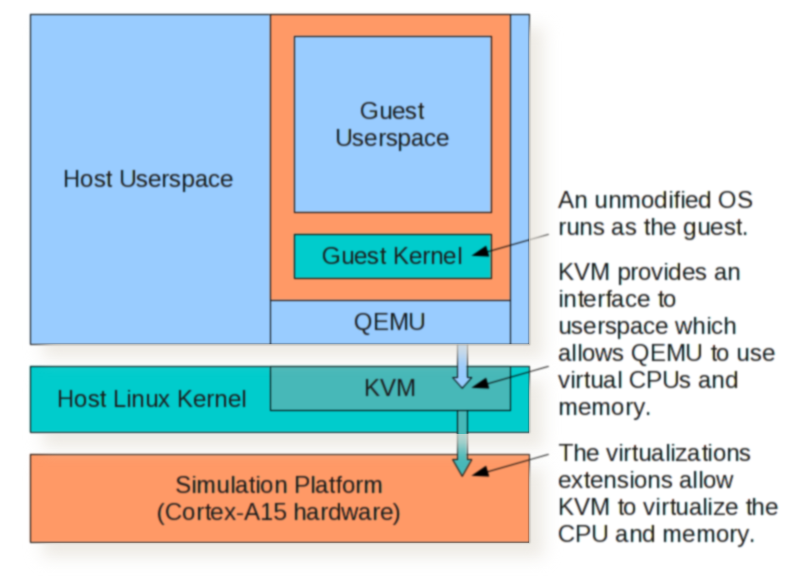
Boot a guest VM. Using the already prepared host kernel and filesystem, we will start a guest OS under KVM/ARM.**
The final system, running with a guest under our host Linux system, can be illustrated as follows:
For more information on the hardware architecture see the ARM Architecture Reference Manual for v7-a processors. Other related documentation includes the Virtualization Extensions documentation as well as the Large Physical Address Extensions (LPAE). These can be found on the ARM Infocenter.
Simulation platform
Since hardware access to a newer ARM platform cannot be assumed for everyone, we can use the Fast Models simulator instead. An evaluation version is available from ARM's web site. Click the Download now button and proceed to find the Fast Models Evaluation Linux. A registration with ARM is necessary to be able to proceed with the download of the software.
The latest version of the platform at the time of this writing is 8.3. When downloading the software one can also receive a license file for a 45 day evaluation. Unpack the software and read the installation instructions in Installation_Guide.txt. The official instructions claim support for gcc 4.1.2 or gcc 4.4.4, however in our experience more recent versions offered by modern distributions usually tend to work better.
At this point we need to make sure the system has installed all the standard development tools. If not, we can install them using the distribution's package management tools, e.g. on Debian and Ubuntu:
$ sudo apt-get install build-essential xutils xutils-dev
Run ./setup.bin and choose an installation directory and the location of the license file; e.g. /home/user/ARM/. It is also advised to edit the current user's .bashrc file and add a line like this:
$ source ~/ARM/FastModelsTools_8.3/source_all.sh
In the opposite case this command will need to be run manually each time we need to use the Fast Models simulation platform.
Tip
Network interface
In some distributions the license manager might not find eth0 or assume a HOSTID of 000000000000. In that case we need to configure the Linux system used to name the first network interface eth0; check the distribution's documentation, or see the instructions for Fedora.
Building a simulation platform
After installing and setting up Fast Models, we may run sgcanvas in order to start the Fast Models tool used to design and compile a simulation platform. We will use a Cortex-A15 based model provided by ARM; open the project located at FastModelsPortfolio_8.3/examples/FVP_VE/Build_Cortex-A15x1/FVP_VE_Cortex-A15x1.sgproj. Alternatively, using one of the available multicore Cortex-A15 model is possible as well.
Tip
On missing lstdc++
If the build fails on a 64 bit system, complaining that lstdc++ cannot be found, then try the following:
$ sudo ln -s /usr/lib/i386-linux-gnu/libstdc++.so.6 /usr/lib32/libstdc++.so
We can now compile the model by going to Project > Build System. If the System Canvas complains about GCC, make sure to press the settings button and change the compiler combobox to plain gcc. Afterwards, use a terminal to navigate to the project directory and run the model:
$ cd FastModelsPortfolio_8.3/examples/FVP_VE/Build_Cortex-A15x1/Linux-Release-GCC-4.1/
$ model_shell cadi_system_Linux-Release-GCC-4.1.so
The simulation of the platform should start; however we have provided no software for it, therefore nothing interesting can happen yet.
Tip
64 bit systems
You can use model_shell64 instead of model_shell on 64 bit systems, though we advise against it due to minor performance degradation.
The host Linux system
Having a working simulation platform of an ARM Cortex-A15 with hardware virtualization support, we can now build the Linux system that will serve as the host. We will need the following:
Cross compiler to build our kernel
Host Linux kernel
Device tree blob
Bootloader
File system
Cross Compiler
We will need a GCC 4.8 based cross compiler with binutils minimum version 2.23, which includes support for Cortex-A15 and its Virtualization Extensions. Fortunately Ubuntu already includes a capable cross compiler for this task.
$ sudo apt-get install binutils-arm-linux-gnueabihf \
               libc6-armhf-cross linux-libc-dev-armhf-cross libncurses5-dev \
               gcc-arm-linux-gnueabihf libc6-dev-armhf-cross cpp-arm-linux-gnueabihf
The host Linux kernel
A precompiled kernel image can be downloaded from:
$ wget http://www.virtualopensystems.com/downloads/guides/kvm_on_arm/uImage
We use a recent upstream kernel for development including recent patches for LPAE support. To download the latest kernel for KVM on ARM development from the Virtual Open Systems repository, follow these few steps:
$ sudo apt-get install git
$ git clone git://github.com/virtualopensystems/linux-kvm-arm.git
$ cd linux-kvm-arm
Also, mkimage from the u-boot package is required to build a kernel uImage; under Debian or Ubuntu we can do the following to install it:
$ sudo apt-get install u-boot-tools
Configuring the kernel for cross compilation does not differ much than usual, however it is important to set the ARCH and CROSS_COMPILE variables.
We can download a premade configuration for the kernel:
$ curl http://www.virtualopensystems.com/downloads/guides/kvm_on_arm/kernel-config > .config
$ CROSS_COMPILE=arm-linux-gnueabihf- ARCH=arm make menuconfig
And finally compile our host kernel:
$ LOADADDR=0x80008000 CROSS_COMPILE=arm-linux-gnueabihf- ARCH=arm make uImage
Flattened Device Tree
If you want to skip this chapter you can download the Device Tree Blob files:
$ wget http://www.virtualopensystems.com/downloads/guides/kvm_on_arm/host-a15.dtb
$ wget http://www.virtualopensystems.com/downloads/guides/kvm_on_arm/guest-a15.dtb
Newer kernel versions (3.4 or later) require FDT support in order to boot a Cortex-A15 host.
Grab the Device Tree Source files:
$ git clone git://github.com/virtualopensystems/arm-dts.git
On our kernel source root:
$ ./scripts/dtc/dtc -O dtb -o host-a15.dtb \
       ../arm-dts/fast_models/rtsm_ve-cortex_a15x1.dts
$ ./scripts/dtc/dtc -O dtb -o guest-a15.dtb \
       ../arm-dts/versatile_express/vexpress-v2p-ca15-tc1.dts
The resulting Device Tree Blob files should be used with the host bootloader and QEMU, as instructed on the following chapters.
Bootloader
To skip this step you can download a precompiled version of the bootwrapper:
$ wget http://www.virtualopensystems.com/downloads/guides/kvm_on_arm/linux-system-semi.axf
We don't use u-boot to run Cortex-A15 yet, but instead a small custom bootloader, with the necessary hypervisor monitor API used to initialize KVM. We can clone a copy of this bootloader from the Virtual Open Systems repository:
$ git clone git://github.com/virtualopensystems/boot-wrapper.git
Finally, to create the system image file, we simply do:
$ make clean
$ LOADADDR=0x80008000 CROSS_COMPILE=arm-linux-gnueabihf- ARCH=arm make
Host file system
We will boot our filesystem from a NFS share exported by the machine we use for development. Of course any machine accessible from the local network could be used instead. First we need to make sure NFS is installed, with the help of our distribution's tools. E.g. for Debian and Ubuntu:
$ sudo apt-get install nfs-kernel-server nfs-common
Make sure an appropriate directory is exported in /etc/exports with the right settings. For example:
/srv/nfsroot 192.168.0.0/255.255.0.0(rw,sync,no_root_squash,no_subtree_check,insecure)
The above configuration defines an NFS share in /srv/nfsroot, accessible by any machine on the local network with an IP address of 192.168.x.x. Also, make sure to restart the nfs server after editing /etc/exports:
$ sudo /etc/init.d/nfs-kernel-server restart
Any file system compatible with the processor can be used. A starting point can be one of the file system images from http://www.arm.com/community/software-enablement/linux.php. Alternatively you can download this minimal busybox environment:
$ wget http://www.virtualopensystems.com/downloads/guides/kvm_on_arm/fs-alip-armel.cramfs
We need to extract the tar in our exported NFS share:
$ sudo mount -o loop -t cramfs fs-alip-armel.cramfs /mnt
$ sudo cp -a /mnt/* /srv/nfsroot/
$ sudo umount /mnt
Tip
Use another host boot method
In case you don't want to boot the host through NFS, check chapter MMC host booting.
Testing the host system
At this point we have everything we need to boot a fully working Linux system on the Fast Models based Cortex-A15 simulation platform. We should now test, that everything works as expected.
We will need to return to the directory where we built our Cortex-A15 model, which we will run with a number of parameters. For convenience we will add our parameters to a params file:
motherboard.smsc_91c111.enabled=1
motherboard.hostbridge.userNetworking=1
cluster.cpu0.semihosting-cmd_line="semihosting arguments"
Semihosting arguments format:
Kernel: --kernel /path-to/uImage
Optional initrd: --initrd /path-to/initrd
Optional device tree file: --dtb /path-to/dtb
Kernel arguments: followed by a double dash and a space "-- "
In our case, to boot the host kernel, the semihosting arguments should be (in one contiguous line):
"--kernel uImage --dtb host-a15.dtb -- earlyprintk console=ttyAMA0
     mem=2048M root=/dev/nfs nfsroot=192.168.x.x:/srv/nfsroot/ rw ip=dhcp"
Now we can run our model:
$ model_shell cadi_system_Linux-Release-GCC-4.1.so -f params \
               ~/ARM/boot-wrapper/linux-system-semi.axf
After a while, we should be able to login as root, greeted by a Busybox shell for us to use.
Optionally you can check the Booting without semihosting chapter, in the unlikely case you don't need the semihosting feature of the bootloader.
Preparing the system to boot a guest
We can now proceed to prepare our host to be able to boot guest systems. A precompiled binary of qemu can be downloaded from our website, which can be used to skip this section and the next one:
$ wget http://www.virtualopensystems.com/downloads/guides/kvm_on_arm/qemu-system-arm
QEMU requires a few dependencies, we can use the tools provided by Ubuntu, to easily get all of them for the cross compiled ARM build of QEMU:
$ sudo apt-get build-dep qemu
$ sudo apt-get install xapt
Create a file like /etc/apt/sources.list.d/armhf-saucy.list with the required repositories:
deb [arch=armhf] http://ports.ubuntu.com/ubuntu-ports saucy main restricted universe multiverse
deb-src [arch=armhf] http://ports.ubuntu.com/ubuntu-ports saucy main restricted universe multiverse
Now we can build and install the required packages:
$ sudo xapt -a armhf -m -b zlib1g-dev libglib2.0-dev libfdt-dev libpixman-1-dev
$ sudo dpkg -i /var/lib/xapt/output/*.deb
We also need to download and install this package on Ubuntu:
$ sudo apt-get install pkg-config-arm-linux-gnueabihf
QEMU
We need to build QEMU to emulate devices and drive KVM from user space. We can clone the latest version with KVM on ARM support from the Virtual Open Systems repository:
$ git clone git://github.com/virtualopensystems/qemu.git
Login or register to access full information