


Full Virtualization with KVM on Versatile Express
A step by step guide to deploy KVM virtualization on Cortex-A15 SoC
This guide is about how to deploy KVM full virtualization on a real ARM Cortex-A15 Versatile Express hardware platform. It showcases the full virtualization extensions of Cortex-A15, based on recent KVM-on-ARM developments by Virtual Open Systems, to enable multiple instances of guest operating systems, while delivering near-native performance. Starting with this implementation, customer specific use cases could be easily realized such as Android multi-persona, BYOD, virtualizing heterogeneous OSes or multiple instances of the same OS.
Introduction
Until recently, the majority of work being done on the port of KVM for the ARM architecture, was done through Fast Models. Due to the scarcity of real Cortex-A15 hardware, Fast Models proved to be a crucial tool to jump-start the development of the project. But while it provides a direct and easy to use alternative, it has major shortcomings in regard to performance and time linearity depending on the work load.
With the newer release of established SoC platforms (Exynos, OMAP, Tegra) in late 2012 and 2013, hardware availability for Cortex-A15 has started to become broader. ARM currently provides two different Cortex-A15 CoreTiles on their Versatile Express platform. A dual core Cortex-A15 (TC1) running at 1.2 GHz, and their latest (TC2) CoreTile, adding a dual core A7 cluster which is the low power version of A15 (also called big.LITTLE).
This guide will focus on deploying a Ubuntu host on the Versatile Express board, with the latest KVM-on-ARM kernel functionality. Subsequently we will show how to fully virtualize two different guests:
 Android Jelly Bean
Ubuntu 12.04
With Android we can really show that UI interactivity is quite decent in performance, even with the lack of hardware acceleration in Versatile Express platform. On the other hand a Ubuntu guest, can give us a taste of the future deployment on large scale ARM servers. In order to get an idea of the end result, a video demonstration has been developed, as well as other video demonstrations related with the virtualization development activity of the company.
Requirements
In order to be able to complete this guide, there are some basic requirements:
Versatile Express board, with a Cortex-A15 (TC1) or big.LITTLE (TC2) CoreTile
Linux development environment. Please have a look on the KVM-on-ARM guide
PS/2 or USB Mouse & Keyboard
Monitor with a resolution of at least 1024 * 768
USB hard disk or flash drive, as the boot medium
Versatile Express
The Versatile Express family of development platforms provides the right environment for prototyping the next generation of system-on-chip designs. Thanks to its flexible, modular architecture, and high-speed interfaces, hardware and software applications can be developed and debugged quickly and efficiently.

Versatile Express Block Diagram [1]
Platform Overview
The platform consist of three main blocks:
Motherboard: Consists of several peripherals and the optional addition of plug-in daughter boards.
CoreTile: CPU block supporting Cortex-A15, Cortex-A9 and Cortex-A5 processors.
LogicTiles: Optional daughter board blocks for the purpose of enhancing the usability of the platform, granting various customizable features.
Cortex-A15
The new Cortex A15 MPCore processor, is the first in the ARM A series to introduce hardware virtualization, together with increased performance (up to 40% faster than A9) and the standard ARM low power requirements. Key features include:
Full Virtualization using Hardware Extensions
Large Physical Address Extensions (LPAE)
VFPv4 Floating point
NEON Advanced SIMD extensions
1-4x SMP within a single processor cluster and upto 2 clusters per chip
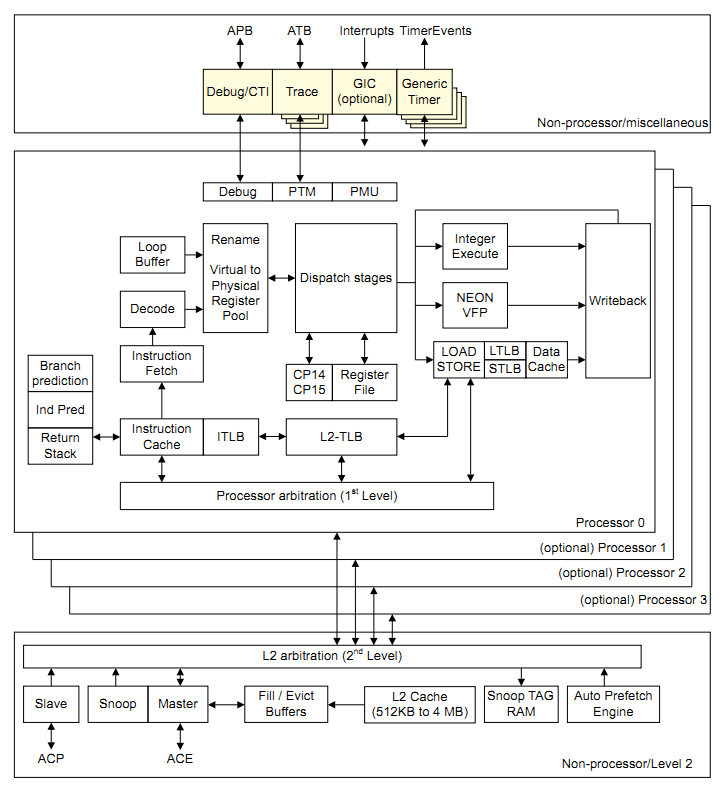
Cortex-A15 block diagram [2]
Peripheral Components
Some of the major components of the Versatile Express (and Cortex-A15) platform are:
PL011 UART (serial communication)
PL031 Real Time Clock
PL050 PS2 Mouse & Keyboard Interface
PL110/PL111 Color LCD/HDLCD (software rendering, no GPU)
PL180 MultiMedia Card Interface (MMCI)
PL390 Generic Interrupt Controller (GIC)
PL041_AACI Audio Interface
SMSC91C111 Ethernet Controller
ISPI1761 USB 2.0 Controller
Kernel
For this guide we are going to use two different kernel images. Both of the kernels will be configured for the Versatile Express platform, with the only difference being the Device Tree file for each one (appended on the images).
If you want to skip the task of compiling your own kernel you can download both of the kernel images from Virtual Open Systems.
$ wget http://www.virtualopensystems.com/downloads/guides/kvm_on_arm_vexpress/host_zImage
$ wget http://www.virtualopensystems.com/downloads/guides/kvm_on_arm_vexpress/guest_zImage
Compiling the kernel
For the host we are going to need a kernel with the latest driver compatibility and Cortex-A15 support. Clone the following repository:
$ git clone git://github.com/virtualopensystems/linux-kvm-arm.git -b kvm-vexpress-3.9
Also you will need the following configuration to compile the kernel:
$ curl http://www.virtualopensystems.com/downloads/guides/kvm_on_arm_vexpress/config > .config
$ CROSS_COMPILE=arm-linux-gnueabi- ARCH=arm make
Finally, create and append the correct device tree blob for the host:
$ CROSS_COMPILE=arm-linux-gnueabi- ARCH=arm make dtbs
$ cp arch/arm/boot/zImage ./host_zImage
$ cat arch/arm/boot/dts/vexpress-v2p-ca15-tc2.dtb >> host_zImage
And for the guest:
$ cp arch/arm/boot/zImage ./guest_zImage
$ cat arch/arm/boot/dts/rtsm_ve-cortex_a15x1.dtb >> guest_zImage
Bootloader
The Versatile Express development platform has two bootloaders. The MCC command line interface (standby mode), responsible for the motherboard, and BootMonitor which (among others) has an in-built linux kernel loader, to run the end system.
Unfortunately the KVM hypervisor needs a custom bootloader to set the necessary monitor API, so we will have to build and flash our own. If you want to skip the compilation part of the bootloader, you can download a pre-compiled binary from Virtual Open Systems:
$ wget http://www.virtualopensystems.com/downloads/guides/kvm_on_arm_vexpress/board.axf
Compiling
Clone the following bootloader from the Virtual Open Systems repository (do this inside the kernel source):
$ git clone git://github.com/virtualopensystems/boot-wrapper.git
This bootloader is mainly used for the Fast Models simulator, in our case we need to modify it for the Versatile Express board. Download and apply the following patch:
$ wget http://www.virtualopensystems.com/downloads/guides/kvm_on_arm_vexpress/bootwrapper.diff
$ patch -p1 < bootwrapper.diff
We can now proceed with compiling:
$ ARCH=arm CROSS_COMPILER=arm-linux-gnueabi- LOADADDR=0x80008000 make
Flashing
Compiling the bootloader should produce an elf image named board.axf. This resulting image has to be flashed on the board. There are two methods for this, either through BootMonitor's flash menu or from editing the configuration files of the on-board microSD card.
The easiest method is the later, so connect the Versatile Express board with your PC via USB, and press the red button once from the board's back panel to enter BootMonitor. A new USB mass storage device will appear on your PC, and you will be able to browse the contents of the internal microSD card.
Copy the bootloader board.axf, on the SOFTWARE folder, then edit the file SITE1/HBI0237A/images.txt or SITE1/HBI0249A/images.txt. Normally the default images.txt should look like this (depending on the board's installed firmware):
TITLE: Versatile Express Images Configuration File

[IMAGES]
TOTALIMAGES: 1                   ;Number of Images (Max : 32)
NOR0UPDATE: AUTO                 ;Image Update:NONE/AUTO/FORCE
NOR0ADDRESS: BOOT                ;Image Flash Address
NOR0FILE: \SOFTWARE\bm_v517r.axf ;Image File Name
Change TOTALIMAGES to 2 and add the following lines:
NOR1UPDATE: AUTO
NOR1ADDRESS: 00000000
NOR1NAME: board
NOR1FILE: \SOFTWARE\board.axf
NOR1LOAD: 80000000
Also make sure that board.txt should be like the following for the TC2 CoreTile (based on the Versatile Express release 5.0):
$ wget http://www.virtualopensystems.com/downloads/guides/kvm_on_arm_vexpress/board.txt
On the next reboot the custom bootloader should be flashed on the internal NOR flash memory (press the black button then the red to reboot properly).
Setting up the userland
Two different userland filesystems will be used for the use case of this guide. Both Ubuntu instances (host and guest) can share the same userland (obviously in a different medium).
The root password for the Ubuntu host and guest is "asdf". Also, notice that the creation of the Android userland is beyond the scope of this guide. The provided binaries are based on Android Jelly Bean v4.1.1.
Ubuntu userland creation
We will start by creating a basic Ubuntu filesystem for ARM architectures, by utilizing debootstrap:
$ sudo apt-get install qemu-user-static
$ mkdir precise
$ sudo qemu-debootstrap --arch=armel precise ./precise/
As soon as qemu-debootstrap finishes with the filesystem creation, we have to edit some files manually (always as root). First we need to properly tell Ubuntu where the package repositories are located.
Edit etc/apt/sources.list from the created filesystem folder and add:
deb http://ports.ubuntu.com/ precise main restricted universe
deb-src http://ports.ubuntu.com/ precise main restricted universe
Copy etc/init/tty1.conf to ttyAMA0.conf and change the last word tty1 to ttyAMA0 in order to enable a login prompt when the system is completely booted.
Additionally, append to etc/network/interfaces a dns entry(change accordingly to the dns of your choice):
dns-nameservers 8.8.8.8
Next, we have to generate a password for the system in order to be able to login:
$ sudo chroot ./precise
$ passwd
We can now start and install some packages with apt-get:
$ apt-get update
$ apt-get install gcc make ssh xorg fluxbox libsdl-dev tightvncserver \
                  libfdt-dev bridge-utils uml-utilities git
$ apt-get clean
$ exit
For the Ubuntu guest we can use the same files, so now it would be a good idea to create an image file of the ubuntu userspace that we just created:
$ dd if=/dev/zero of=./ubuntu.img bs=1MiB count=512
$ mkfs.ext3 ./ubuntu.img
Then, mount the image file and copy the userland files in it:
$ mkdir mnt
$ sudo mount -o loop ubuntu.img mnt/
$ sudo cp -a precise/* mnt/
$ sudo umount mnt/
Finally, archive the userland directory:
$ sudo tar -cpjvf ../host.tar.bz2 ./precise --numeric-owner
Login or register to access full information