


sVirt Security for KVM Virtualization on OMAP5 uEVM
How to protect KVM Guests using sVirt on Cortex-A15 OMAP5
This is a step by step guide made available by Virtual Open Systems to deploy the KVM hypervisor with sVirt on an OMAP5 uEVM real hardware ARM Cortex-A15 target. sVirt ensures a security solution through SELinux to completely isolate virtual machines and protect the guest systems from attacks, from the host or other virtual machines. At the end of this document the reader should be able to run a secure guest, i.e. a virtual machine completely and securely isolated from the outside world.
Introduction to KVM virtual machines through sVirt
The number of mobile devices powered by the ARM architecture is rapidly increasing nowadays. In the meantime, the new ARM v8 architecture is challenging the server market. Virtualization is becoming a key technology in all market segments; in embedded devices it can be used to isolate applications or to enable BYOD feature, in computing it's relevant to optimize power efficiency in data centers and pave the way to distributed and federated cloud architectures, in networking to turn monolithic hardware to software dynamically defined networks and enable Network Functions Virtualization (NFV).
Security plays a key factor in complex systems. As a matter of fact whenever a guest system is compromised, within a virtualized environment, there is a risk that other virtual machines (VMs) as well as the host itself can be threatened. To protect the system from hypervisor vulnerabilities and compromised guests, there is only one solution: isolation. In this way, every attack is confined in a specific domain that belongs only to a single VM. In this document Virtual Open Systems shows how to securely isolate VMs with the KVM hypervisor in conjunction with SELinux and sVirt components.
Hardware requirements to build an sVirt test environment
The basic requirements to run a secure guest within this guide are:
 TI OMAP5 uEVM board
USB flash disk, 4 GB or more microSD card (with the adapter)
Personal computer with Ubuntu 13.10 or similar distribution
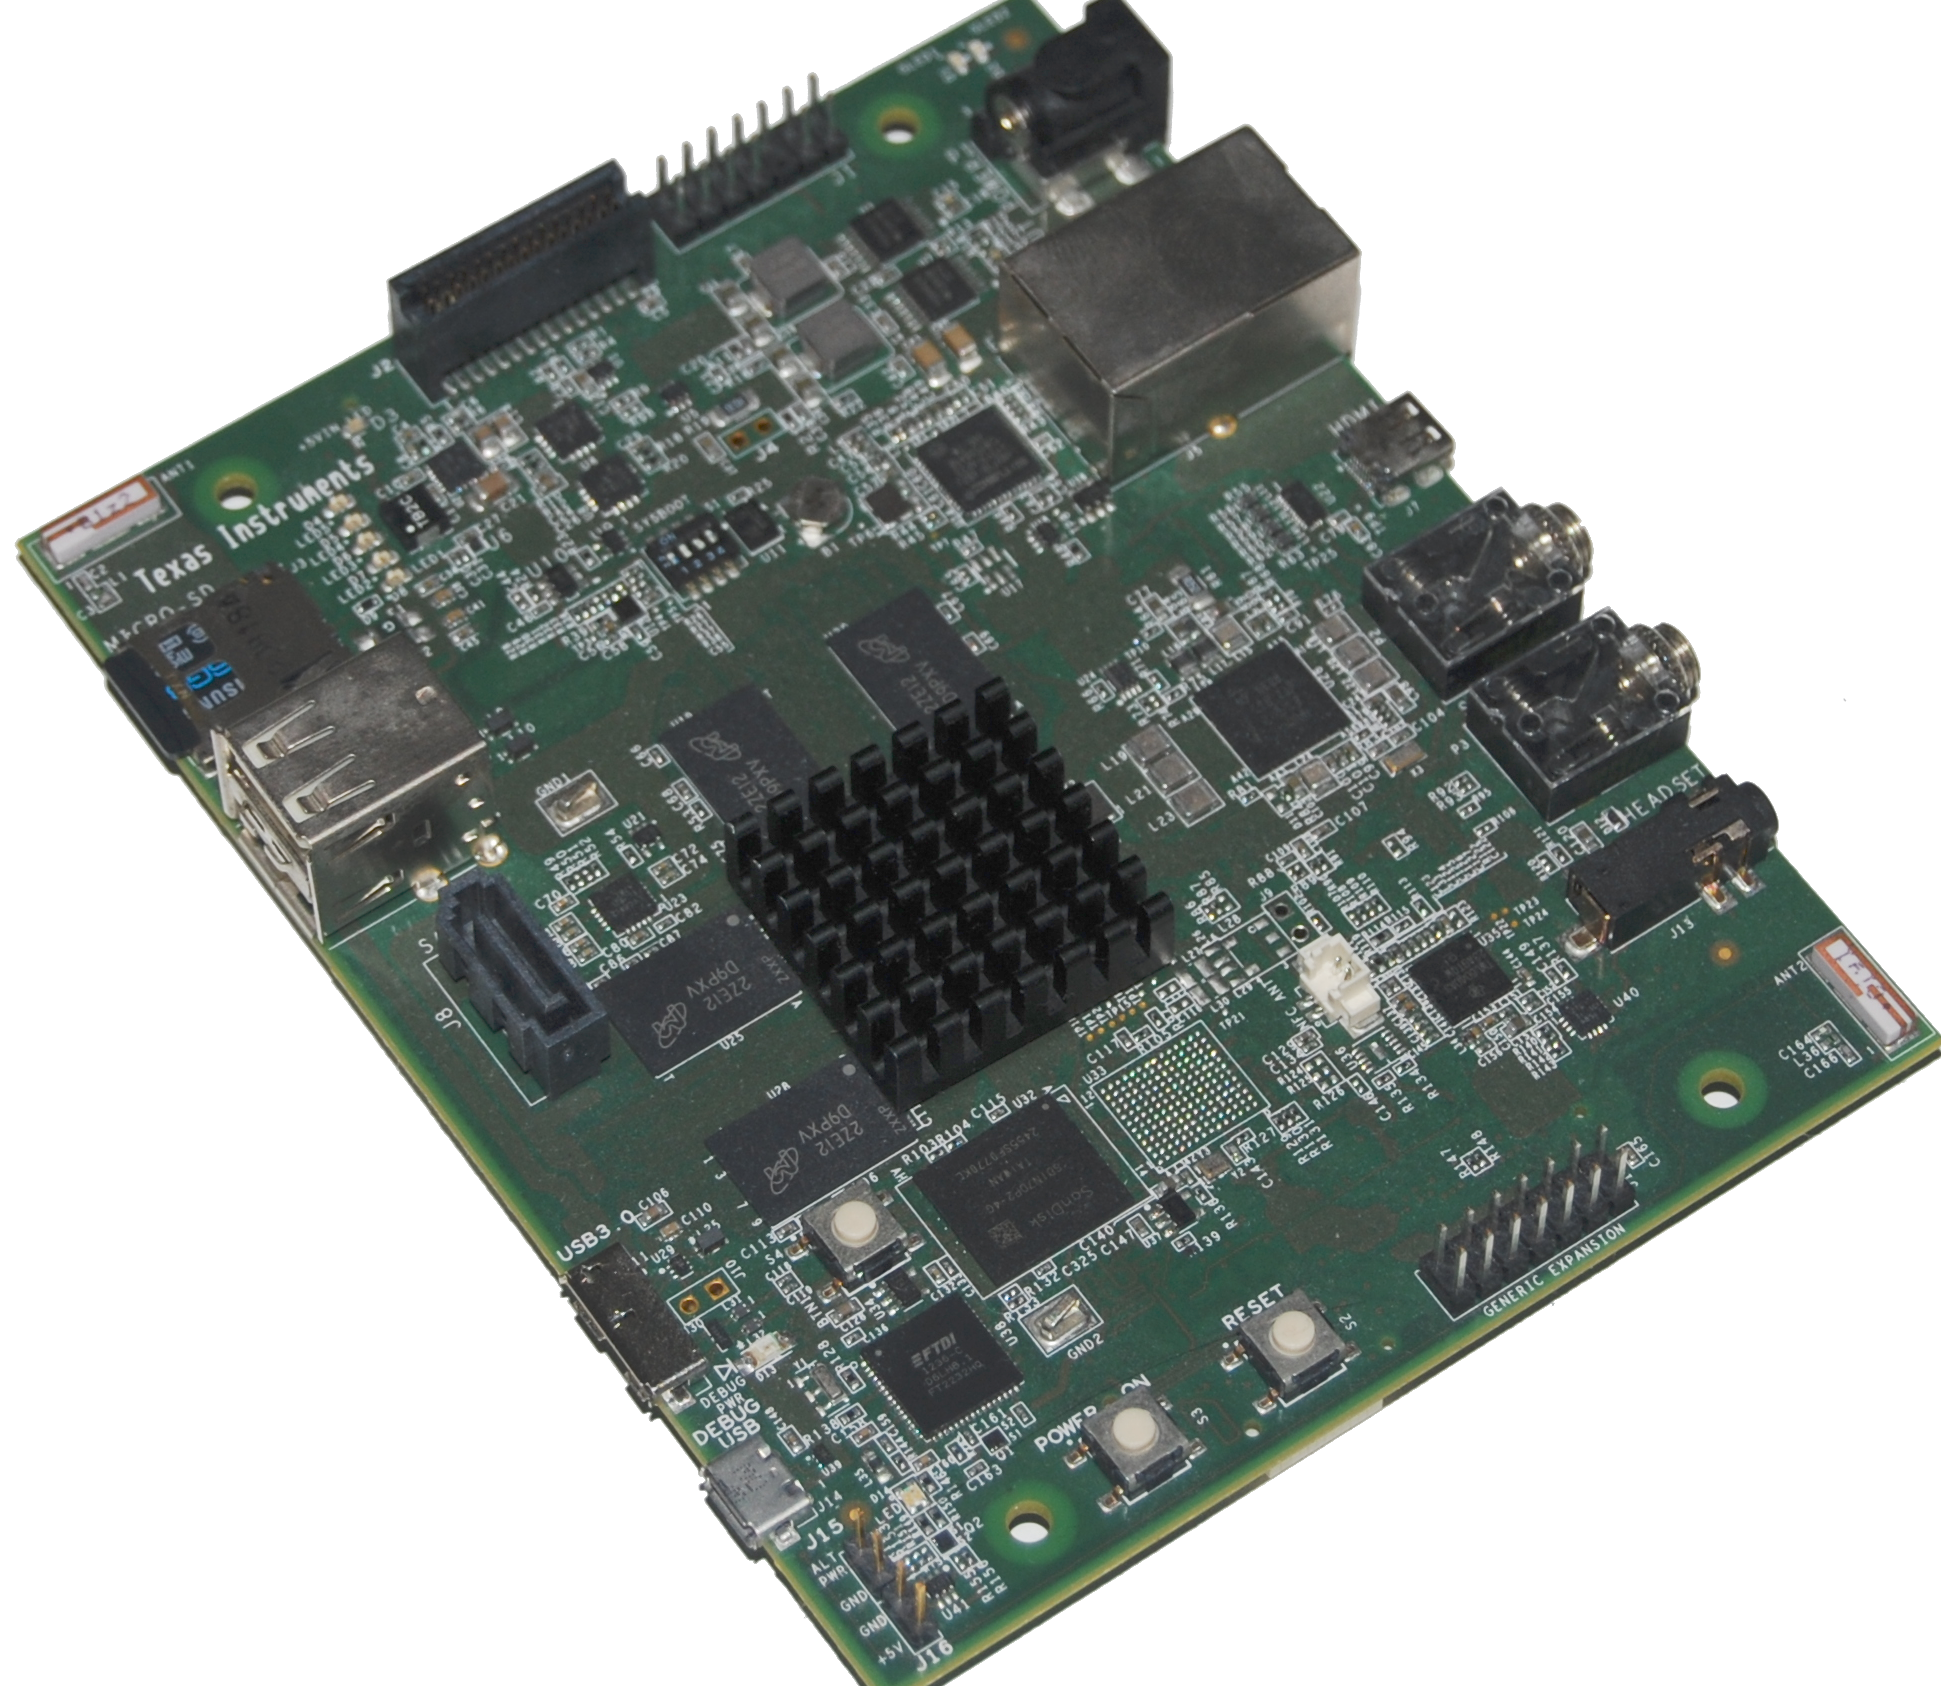
TI OMAP5 uEVM Development board
Preparing the TI OMAP5 uEVM environment
The OMAP5 uEVM development environment can be set up by running the scripts provided by TI in the OMAP5 Software Developer Guide . We'll focus on the steps needed to deploy high security virtual machines, assuming that the OMAP5 board has already been configured with the microSD partitioning and the installation of u-boot.
Note
The u-boot version used in this guide is 2013.01. It's possible to download it with the TI GLSDK version 6_00_00_07.
In the following sections we will see how to enable KVM and sVirt on the TI OMAP5 uEVM, substituting the board's kernel with a new one, installing libvirt and activating SELinux security. In order to do this, the software requirements are:
Cross compiler and required packages
Host and guest Linux kernel
Host and guest filesystem
The following sections will describe step by step how to accomplish these requirements.
Cross compiler and required packages
To proceed, we need to install a cross compiler and a couple of additional required packages on the Linux distribution (Ubuntu 13.10):
$ sudo apt-get install build-essential git libncurses5-dev \
                        xz-utils kpartx wget debootstrap  \
                        curl qemu-user-static u-boot-tools \
                        gcc-arm-linux-gnueabihf
Compile the host and guest Linux kernel
To enable KVM and SELinux on OMAP5 uEVM, the board's kernel needs to be recompiled. This section will give details on how to proceed, nevertheless it's possible to download pre-compiled kernel images and DTB files from Virtual Open Systems' website, executing the following commands:
$ wget http://www.virtualopensystems.com/downloads/guides/kvm_svirt_omap5/uImage
$ wget http://www.virtualopensystems.com/downloads/guides/kvm_svirt_omap5/zImage
$ wget http://www.virtualopensystems.com/downloads/guides/kvm_svirt_omap5/omap5-uevm.dtb
$ wget http://www.virtualopensystems.com/downloads/guides/kvm_svirt_omap5/vexpress-v2p-ca15-tc1.dtb
Jump to the last part of this section related to the installation of kernel and device tree file into the microSD card, in case the above files have been downloaded.
If not, it's possible to download the kernel source from the Virtual Open Systems' repository:
$ git clone git://github.com/virtualopensystems/linux-kvm-arm.git
$ cd linux-kvm-arm
$ git checkout linux-omap5
And for the OMAP5 uEVM kernel configuration specific to the guide's needs, run:
$ curl http://www.virtualopensystems.com/downloads/guides/kvm_svirt_omap5/config-host > .config
We can proceed now with compiling the downloaded sources:
$ ARCH=arm CROSS_COMPILE=arm-linux-gnueabihf- make uImage -j4 LOADADDR=0x80008000
$ ARCH=arm CROSS_COMPILE=arm-linux-gnueabihf- make dtbs
Note
To compile a different kernel, make sure to unset CONFIG_SECURITY_SELINUX_POLICYDB_VERSION_MAX, otherwise it will prevent the boot of the OMAP5 uEVM due to a bug in the SELinux policies downgrade feature.
The guest that we will create later will be based on the Versatile Express QEMU machine model. To compile the guest's kernel we will use the same kernel branch used for the OMAP5 uEVM. Before proceeding, copy arch/arm/boot/uImage and arch/arm/boot/dts/omap5-uevm.dtb in a USB flash disk for later usage.
Compile the guest kernel by executing the following command:
$ curl http://www.virtualopensystems.com/downloads/guides/kvm_svirt_omap5/config-guest > .config
$ ARCH=arm CROSS_COMPILE=arm-linux-gnueabihf- make zImage dtbs -j4
As above, make sure to copy arch/arm/boot/zImage and arch/arm/boot/dts/vexpress-v2p-ca15-tc1.dtb for later usage.
It's now time to install the OMAP5 uEVM kernel and the device tree file (uImage and omap5-uevm.dtb file saved before) to the board's microSD card. In these examples the device /dev/mmcblkX is used. Take extra care to change the examples in respect of the device that is attached. Insert the boot medium on your workstation and carefully execute the following steps.
$ mkdir ../mnt/
$ sudo mount /dev/mmcblkXp1 ../mnt/
$ sudo cp arch/arm/boot/uImage ../mnt/
$ sudo cp arch/arm/boot/dts/omap5-uevm.dtb ../mnt/
$ sudo umount /dev/mmcblkXp1
$ sudo rmdir ../mnt/
At this point we can run a Linux kernel on the board, but there isn't any userspace application to run. Follow the next sections to complete the set-up of the host board and prepare the guest filesystem.
Host filesystem
A fresh image of Fedora 20 will be installed on the OMAP5 uEVM. The filesystem will be downloaded directly from Fedora.
$ wget http://fedora.mirrors.ovh.net/linux/releases/20/Images/armhfp/Fedora-Images-armhfp-20-CHECKSUM
$ wget http://fedora.mirrors.ovh.net/linux/releases/20/Images/armhfp/Fedora-Minimal-armhfp-20-1-sda.raw.xz
It's possible to verify the identity and integrity of the files, using the official Fedora gpg key.
$ curl https://fedoraproject.org/static/fedora.gpg | gpg --import
$ sha256sum -c *-CHECKSUM | grep OK
If the last command returns an OK in correspondence to the file Fedora-Minimal-armhfp-20-1-sda.raw.xz it's possible to safely proceed with the guide.
The content of the compressed file will now be extracted and installed to the board's microSD card. Please take care to adapt the examples to the device that you have attached before executing:
$ xz -d Fedora-Minimal-armhfp-20-1-sda.raw.xz
$ sudo kpartx -va Fedora-Minimal-armhfp-20-1-sda.raw
$ sudo dd if=/dev/mapper/loop0p3 of=/dev/mmcblkXp2
$ sudo e2fsck -f /dev/mmcblkXp2
$ sudo resize2fs /dev/mmcblkXp2
$ mkdir mnt
$ sudo mount /dev/mmcblkXp2 mnt
$ echo "/dev/mmcblk1p2 / ext4 defaults,noatime 0 0" > mnt/etc/fstab
Now we should temporarily remove the root password from /etc/passwd to be able to login into the system for the first time. Using your favorite text editor, open (with sudo or as root) the file mnt/etc/passwd and remove the 'x' char in the first line in correspondence with the root account.
Now we can proceed, urmounting the device and the Fedora virtual image.
$ sudo umount /dev/mmcblkXp2
$ rmdir mnt
$ sudo kpartx -vd Fedora-Minimal-armhfp-20-1-sda.raw
Once the preparation of the host filesystem is done, we can proceed with the creation of the guest filesystem.
Guest filesystem
We will start by creating a basic Ubuntu filesystem for the ARM architecture, by utilizing debootstrap:
$ mkdir precise
$ sudo qemu-debootstrap --arch=armel precise ./precise/
We now have to edit some files manually (always as root). First we need to properly tell Ubuntu where the package repositories are located. Edit etc/apt/sources.list from the created filesystem folder and add:
deb http://ports.ubuntu.com/ precise main restricted universe
deb-src http://ports.ubuntu.com/ precise main restricted universe
Copy etc/init/tty1.conf to ttyAMA0.conf and edit the last tty1 to ttyAMA0.
Additionally, append to etc/network/interfaces the following lines to enable networking:
dns-nameservers 8.8.8.8
auto eth0
iface eth0 inet dhcp
Next, we have to generate a password for the system in order to be able to login:
$ sudo chroot ./precise
$ passwd
We will now create an image file for the ubuntu userspace that we've just modified:
$ dd if=/dev/zero of=./ubuntu.img bs=1MiB count=512
$ mkfs.ext3 ./ubuntu.img
Then, mount the image file and copy the userland files in it:
$ mkdir mnt
$ sudo mount -o loop ubuntu.img mnt/
$ sudo cp -a precise/* mnt/
$ sudo umount mnt/
$ rmdir mnt
The guest userspace is now ready, copy it in your USB flash disk, as we will use it later to boot a secure KVM guest.
Login or register to access full information