


KVM virtualization on Arndale development board
How to port KVM on Exynos5250 Arndale development platform
With this step by step guide Virtual Open Systems demonstrates how to setup a complete KVM virtualization system on the ARM-based Arndale Exynos5250 development board, instructing from how to compile a KVM bootloader upto the creation of a Ubuntu OS userspace. This has been the first demonstration of KVM-on-ARM for a commercial hardware platform using ARM Cortex-A15.
Introduction
Until recently, the majority of work being done on the port of KVM for the ARM architecture, was through Fast Models. Due to the scarcity of real Cortex-A15 hardware, Fast Models proved to be a crucial tool to jump-start the development of the project. But while it provides a direct and easy to use alternative, it has major shortcomings with regards to performance and time linearity depending on the work load.
The only alternative up to now, was to port KVM on ARM's Versatile Express platform, and while it has been a valuable tool for early development of any kind, its bulky size, low availability and user base, but especially its prohibitive cost, makes it unrealistic for people outside the enterprise sector.
But now Cortex-A15/A7 are mature enough, and more parties have started to implement their own platforms/solutions based on ARMv7 and the Virtualization Extensions. Samsung has released the Exynos5250 platform which incorporates a dual-core Cortex-A15 at 1.7 GHz and a Mali-T604 GPU on a 32nm package. The next version of Exynos will scale even further, by using a big.LITTLE architecture with 1.8 GHz quad-core Cortex-A15 together with a quad-core Cortex-A7 at 1.2 GHz.
Exynos5250 as of today is already found in Samsung's ARM Chromebook, the Google Nexus 10 and a development board from Insignal, the Arndale. In this guide we will describe in detail, how to setup a complete virtualization system on the Arndale development board, covering low level subjects, such as how to compile a KVM compatible bootloader, upto the creation of Ubuntu userspace binaries and the use of guests under such a setup.
Requirements
The basic requirements to port KVM on Arndale Exynos development board are:
 An Arndale board with power and serial cable (ethernet also advised)
microSD card (4 GB recommended)
Personal computer with Ubuntu 12.04 LTS or similar distribution
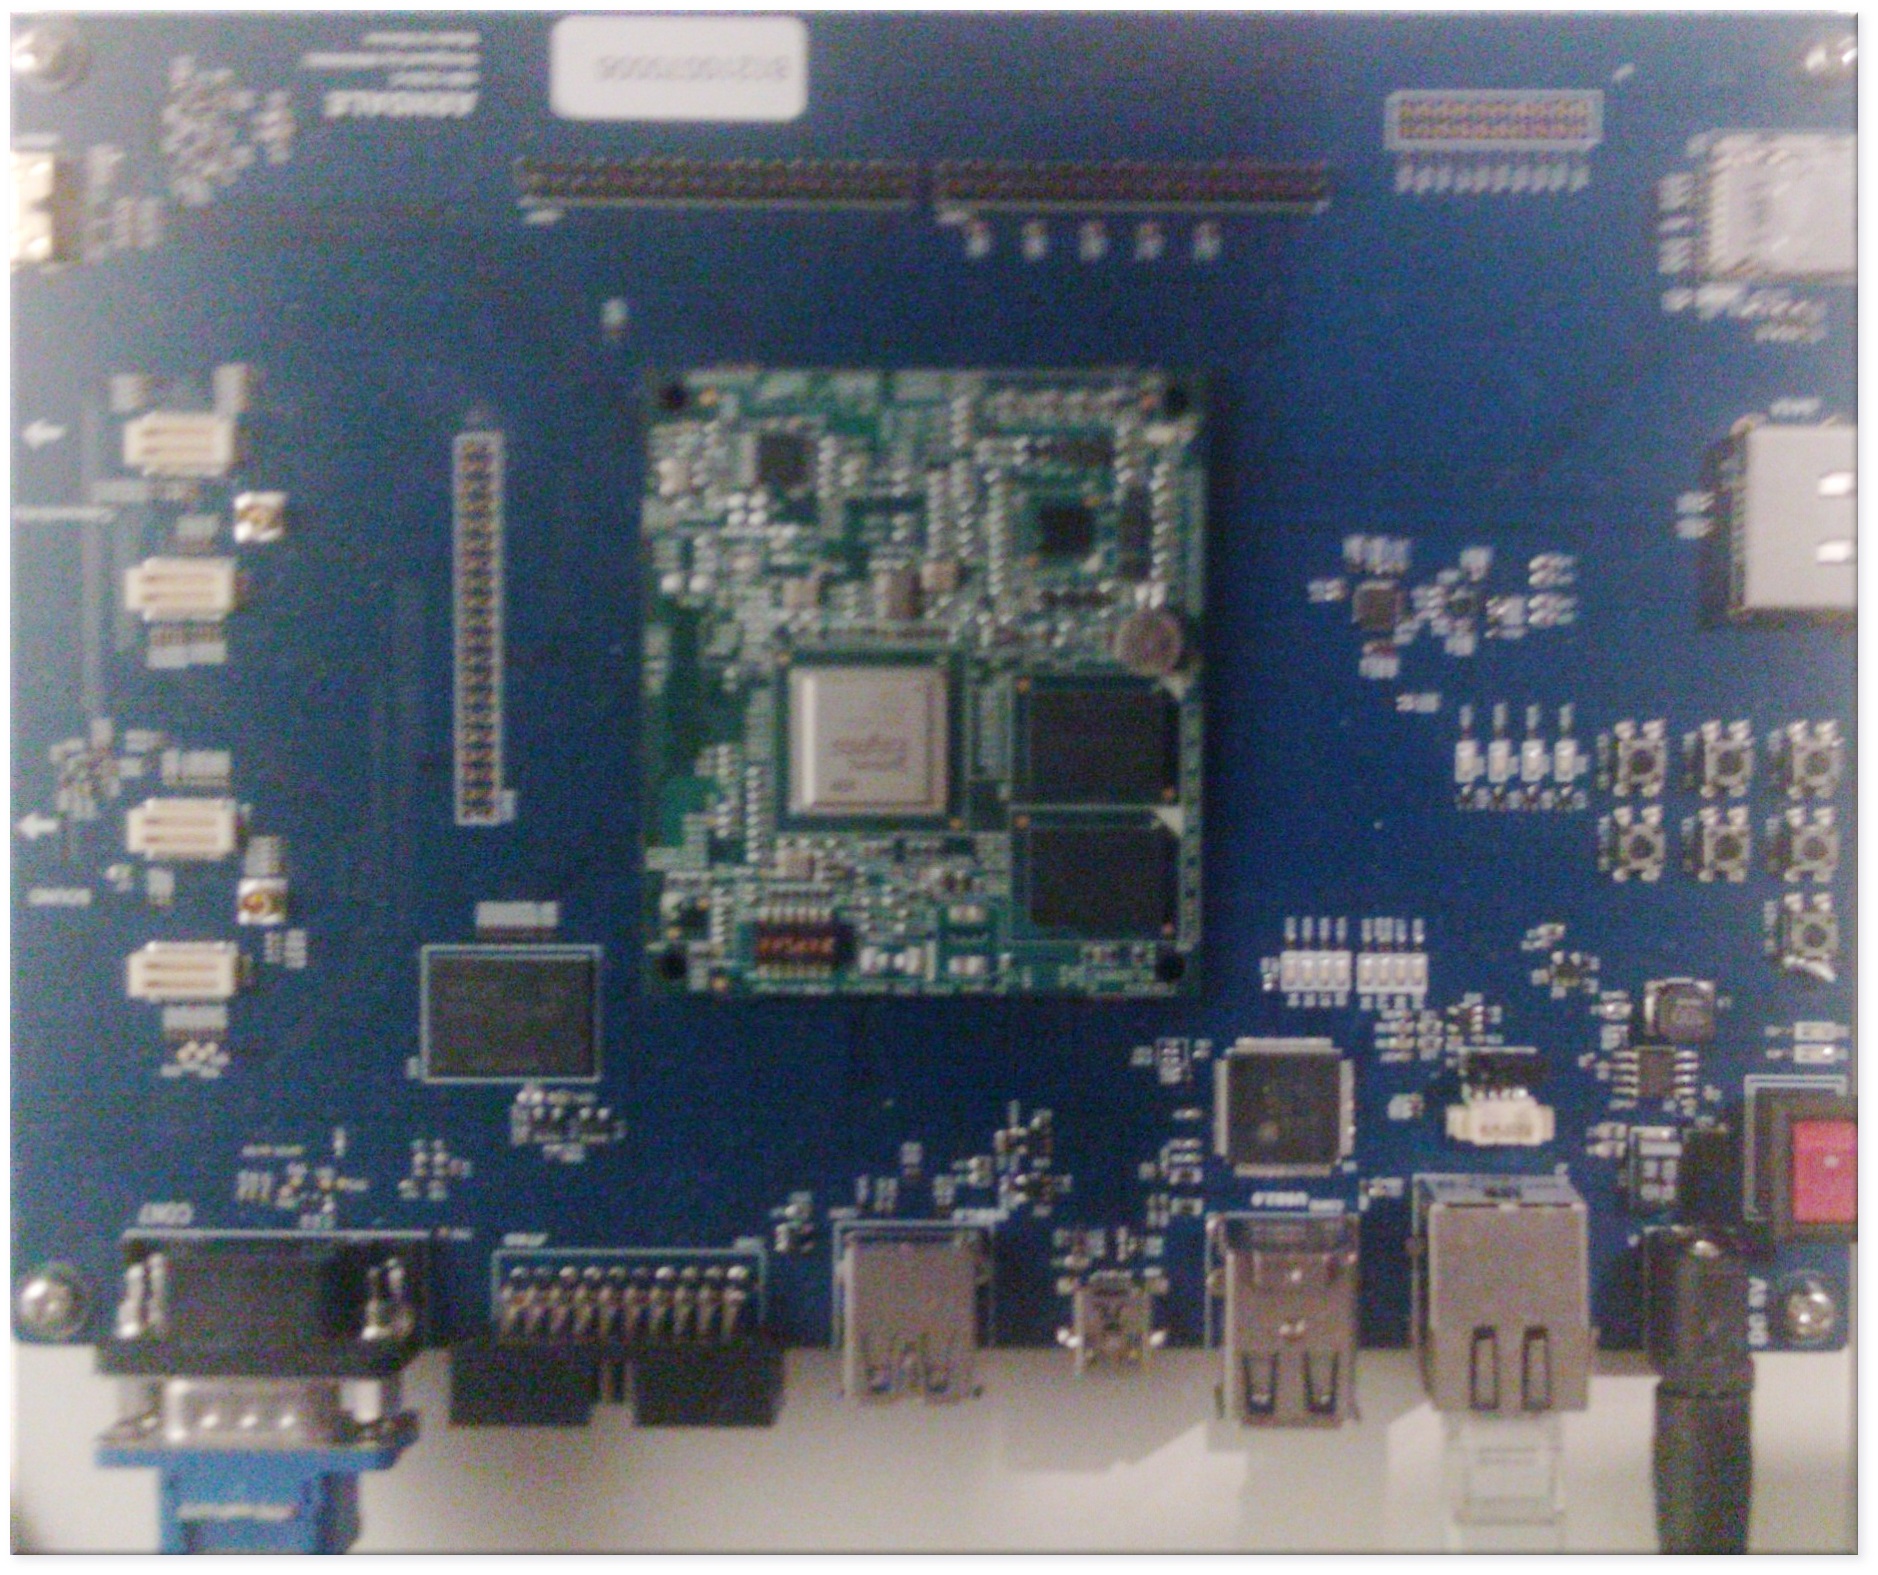
The Arndale Exynos5250 development board
The host Linux system
In order to create a basic bootable system on the Arndale Exynos development board, we need the following:
Cross compiler and required packages
Host Linux kernel
Device Tree Blob
Bootloader
Filesystem
Cross compiler and required packages
To complete the next steps we need to install a cross compiler, and a couple of required packages on our workstation's distribution (Ubuntu 12.04 LTS):
$ sudo apt-get install build-essential git u-boot-tools qemu-user-static libncurses5-dev
And for the cross compiler:
$ sudo apt-get install gcc-arm-linux-gnueabi
The host Linux kernel
A pre-compiled kernel image can be downloaded from:
$ wget http://www.virtualopensystems.com/downloads/guides/kvm_virtualization_on_arndale/uImage
We use an arndale kernel which is based on release 3.8 of the linux kernel with the KVM-on-ARM patchset on top of it (v17). To download the kernel from the Virtual Open Systems repository, follow these steps:
$ git clone git://github.com/virtualopensystems/linux-kvm-arm.git
$ cd linux-kvm-arm
$ git checkout origin/lue_arndale-kvm-3.8 -b arndale-kvm-3.8
For the kernel configuration specific to the Arndale board run:
$ curl http://www.virtualopensystems.com/downloads/guides/kvm_virtualization_on_arndale/arndale-config > .config
$ ARCH=arm CROSS_COMPILE=arm-linux-gnueabi- make menuconfig
We can now proceed with compiling the actual kernel:
$ ARCH=arm CROSS_COMPILE=arm-linux-gnueabi- make uImage
Flattened Device Tree
If you want to skip this chapter you can download the Device Tree Blob files:
$ wget http://www.virtualopensystems.com/downloads/guides/kvm_virtualization_on_arndale/arndale.dtb
$ wget http://www.virtualopensystems.com/downloads/guides/kvm_virtualization_on_arndale/guest-vexpress.dtb
Newer kernel versions (3.4 or later) require FDT support both for the host and the guest.
For the Arndale board it is pretty straight forward, the dtb file can generated from the kernel repository:
$ ARCH=arm CROSS_COMPILE=arm-linux-gnueabi- make dtbs
The output file is arch/arm/boot/dts/exynos5250-arndale.dtb
For the guest we need to grab the Device Tree Source files for the Versatile Express platform:
$ git clone git://github.com/virtualopensystems/arm-dts.git
On the kernel source root:
$ ./scripts/dtc/dtc -O dtb -o guest-vexpress.dtb \
       ../arm-dts/versatile_express/vexpress-v2f-2xv6-ca15x2.dts
The resulting Device Tree Blob files should be used with the arndale bootloader and QEMU, as instructed on the following chapters.
Bootloader
If you wish to skip this chapter you can download pre-compiled binaries of the bootloader:
$ wget http://www.virtualopensystems.com/downloads/guides/kvm_virtualization_on_arndale/smdk5250-spl.bin
$ wget http://www.virtualopensystems.com/downloads/guides/kvm_virtualization_on_arndale/u-boot.bin
To be able to run KVM on ARM platforms the kernel has to be booted in hypervisor mode. Because of this relatively recent requirement (due to the introduction of the virtualization extensions), up until now all booting methods would boot the kernel in Supervisor mode. For this reason, the bootloader of choice for Arndale (u-boot) has to be modified.
$ git clone git://github.com/virtualopensystems/u-boot-arndale.git
$ cd u-boot-arndale
$ ARCH=arm CROSS_COMPILE=arm-linux-gnueabi- make arndale5250
Keep in mind files spl/smdk5250-spl.bin and u-boot.bin, which will be copied to the board's microSD card, as we will see on the following chapters.
File system and booting the host
We will start by creating a basic Ubuntu filesystem for ARM architectures, by utilizing debootstrap:
$ mkdir precise
$ sudo qemu-debootstrap --arch=armel precise ./precise/
As soon as qemu-debootstrap finishes with the filesystem creation, we have to edit some files manually (always as root). First we need to properly tell Ubuntu where the package repositories are located.
Edit etc/apt/sources.list from the created filesystem folder and add:
deb http://ports.ubuntu.com/ precise main restricted universe
deb-src http://ports.ubuntu.com/ precise main restricted universe
Copy etc/init/tty1.conf to ttySAC2.conf and change the last word tty1 to ttySAC2 as well as the baud rate from 38400 to 115200. You will also want to make another copy of tty1.conf as ttyAMA0.conf and once again edit the last tty1 to ttyAMA0 (this step is for the guest userspace). Furthermore, add the line ttySAC2 in etc/securetty in order to enable a root login prompt when the system is completely booted.
Additionally, append to etc/network/interfaces the following lines to enable networking:
dns-nameservers 8.8.8.8
auto eth0
iface eth0 inet dhcp
Next, we have to generate a password for the system in order to be able to login:
$ sudo chroot ./precise
$ passwd
We can now start to install some packages with apt-get:
$ apt-get update
$ apt-get install gcc make ssh xorg fluxbox tightvncserver
$ apt-get install libsdl-dev libfdt-dev bridge-utils uml-utilities
$ apt-get clean
$ exit
The userspace is now ready, we will later use the files created from this step on both the host (the arndale board) and the guest.
Setting up the board's microSD
Now it is time to copy all the relevant files that we created in the previous chapters, to the board's microSD. In all these examples the device /dev/sdX is used for the dd command. Take extra care to change the examples to the device that you have attached. Insert the microSD on your workstation and carefully execute the following steps.
First grab the bl1 binary and copy it together with spl and u-boot:
$ wget http://www.virtualopensystems.com/downloads/guides/kvm_virtualization_on_arndale/arndale-bl1.bin
$ sudo dd if=arndale-bl1.bin of=/dev/sdX bs=512 seek=1
$ sudo dd if=smdk5250-spl.bin of=/dev/sdX bs=512 seek=17
$ sudo dd if=u-boot.bin of=/dev/sdX bs=512 seek=49
Next copy the host kernel and dtb file:
$ sudo dd if=uImage of=/dev/sdX bs=512 seek=1105
$ sudo dd if=arndale.dtb of=/dev/sdX bs=512 seek=9297
Create a partition to copy the ubuntu userspace files that we created. After the fdisk command input as verbatim the following (empty line is the enter key):
$ sudo fdisk /dev/sdX
$ n
$ p
$ 1
$ 10240
$
$ w
Then, format the partition and copy the filesystem:
$ mkdir mnt
$ sudo mkfs.ext3 /dev/sdX1
$ sudo mount /dev/sdX1 mnt
$ sudo cp -a ./precise/* mnt/
$ sudo umount /dev/sdX1
Booting the host
With all the needed files copied to the microSD, we are in a position to boot our system. Insert the microSD in the board along with the serial and power cables. Setup your serial console application of your workstation to the following:
Speed (baud rate): 115200
Data bits:        8
Stop bits:        1
Parity:           None
Flow control:     None
Turn on the board and make sure to setup up the environmental variables on the u-boot prompt, before booting the kernel. Keep in mind that if your SW-TACT1 switch is not shorted (soldered) you have to press it for 2-3 seconds to continue with the boot process. Finally make sure that SW1 (DIP switches in top right corner of the Exynos module) is set to 001000 (counting from the right side 1-6):
$ env edit bootargs
$     root=/dev/mmcblk1p1 rw rootwait earlyprintk console=ttySAC2,115200n8 --no-log
$ env edit bootcmd
$     mmc read 40007000 451 2000;mmc read 42000000 2451 100;bootm 40007000 - 42000000
$ env save
$ boot
You should now be able to see the kernel booting and after a minute or so a Ubuntu login prompt will appear. Check the availability of the device /dev/kvm to ensure that KVM is enabled.
$ ls /dev/kvm
If you want to login to a desktop-like system run:
$ tightvncserver -nolisten tcp :1
Then start a vnc client application of your choice and login to the board remotely.
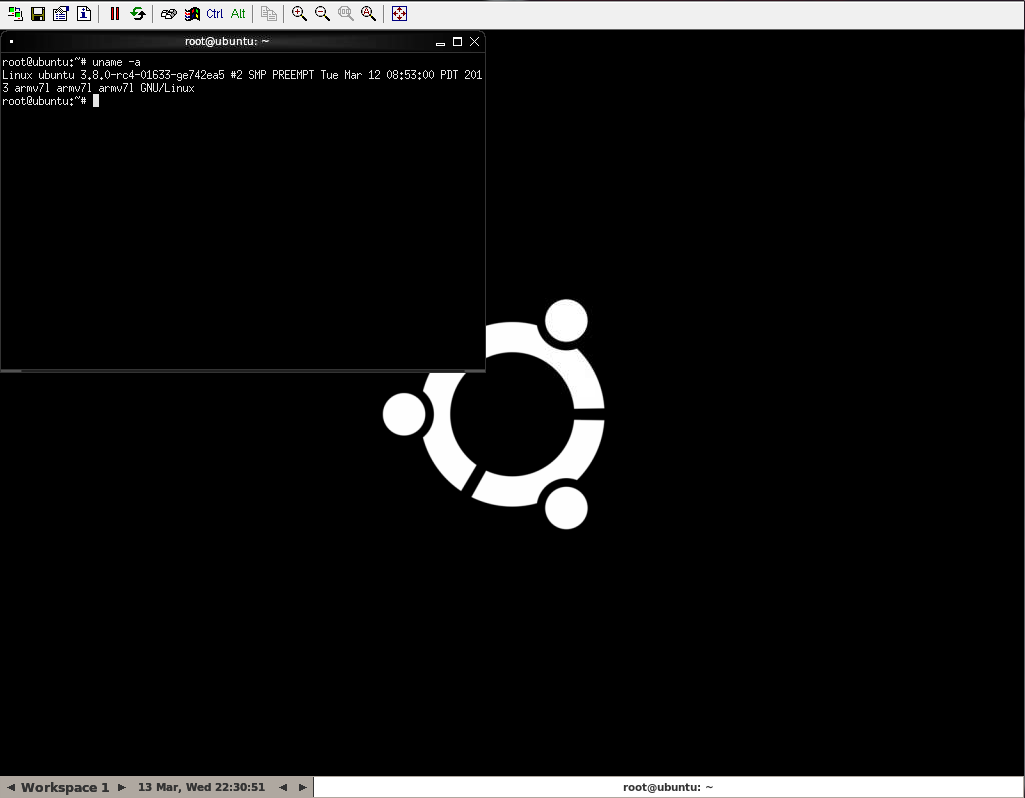
Arndale booted with Ubuntu
Preparing the system to boot a guest
We can now proceed to prepare our host to be able to boot guest systems. A pre-compiled binary of qemu can be downloaded from our website, which can be used to skip this section and the next one:
$ wget http://www.virtualopensystems.com/downloads/guides/kvm_virtualization_on_arndale/qemu-system-arm
QEMU requires a few dependencies, we can use the tools provided by Ubuntu, to easily get all of them for the cross compiled ARM build of QEMU:
$ sudo apt-get build-dep qemu-linaro
$ sudo apt-get install xapt
Create a file like /etc/apt/sources.list.d/armel-precise.list with the required repositories:
deb [arch=armel] http://ports.ubuntu.com/ubuntu-ports precise main restricted universe multiverse
deb-src [arch=armel] http://ports.ubuntu.com/ubuntu-ports precise main restricted universe multiverse
Now we can build and install the required packages:
$ sudo xapt -a armel -m -b zlib1g-dev libglib2.0-dev libfdt-dev libpixman-1-dev
$ sudo dpkg -i /var/lib/xapt/output/*.deb
We also need to download and install this package on Ubuntu.
$ sudo apt-get install pkg-config-arm-linux-gnueabi
Login or register to access full information