


How to create a NXP SDK6 Yocto image with QEMU and VOSYSwitch for LS2085A-RDB
How to setup NXP LS2085A-RDB as KVM virtualization host with VOSYSwitch vSwitch support
The NXP LS2085A-RDB board is a reference platform for a number of scenarios involving virtualization on ARM, in the field of vCPE edge, IoT, Mobile Edge Computing, etc. Still, the original SDK from NXP does not integrate virtualization software by default. To support developers who want to leverage KVM virtual machines on the LS2085A-RDB, Virtual Open Systems provides this step by step guide explaining how to create and install a file-system, containing a virtualization stack and the high performance VOSYSwitch virtual switch solution.
Introduction to virtualization on NXP LS2085A-RDB
The NXP LS2085A-RDB board supports 8 Cortex-A57 cores, 40Gbps advanced I/O processor and 88Gbps L2 switch. These characteristics make it a logical choice for experimental and design-in cloud computing, networking, edge vCPE deployments on an ARMv8 platform.
Note
This guide doesn't describe the process to virtualize a guest on the host Linux, however information about how to enable KVM Virtualization can be found on the Virtual Open Systems' Kvm on armv8 guide.
Prerequisites to virtualize NXP LS2085A-RDB
This guide is based on the NXP LS2085A-RDB board and Ubuntu 16.04 (code name Xenial Xerus). However, all the software tools used hereinafter are also available for other Linux distributions, such as Debian and CentOS. Additional requirements are:
 Workstation with Ubuntu 16.04 or similar distribution
One ethernet cable for connection to the workstation
The LS2085A-RDB "UART2" serial port connected to the workstation with an USB-to-RS232 UART cable
A SATA drive that can be attached to the LS2085A-RDB and the workstation
NXP SDK EAR6 firmware already installed on the LS2085A-RDB (e.g., U-boot and MC)
LS2085A-SDK-SOURCE-<DATE>-yocto.iso and LS2085A-SDK-AARCH64-CACHE-<DATE>-yocto.iso ISO images from NXP
Install SDK environment and build file-system image
This section describes how to install the SDK from NXP and build images with it.
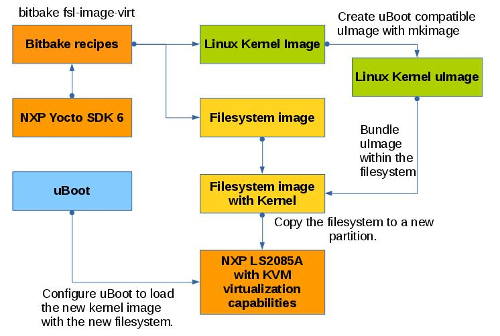
Process of building and running filesystem image with the NXP provided Yocto SDK 6
How to install ISO images of the NXP SDK 6
First of all, the SOURCE ISO image has to be installed:
$ mkdir iso_image
$ sudo mount LS2085A-SDK-SOURCE-<DATE>-yocto.iso iso_image
$ cd iso_image
$ ./install
LS2085A-SDK-<DATE>-yocto: Checking ISO integrity ...
You are about to install the SDK built by Yocto
    LS2085A-SDK-<DATE>-yocto

    Before installing , you must read and accept the EULA
    (End User License Agreement) which will be presented next.

    Do you want to continue ? Y|n
Where to install LS2085A-SDK-<DATE>-yocto? (/home/<USER>)
<SDK6_INSTALL_DIRECTORY>
$ sudo umount iso_image
As a second step, the CACHE ISO image has to be installed. Follow the same steps as above by replacing the ISO image with LS2085A-SDK-CACHE-<DATE>-yocto.iso. There is no need to re-create the iso_image directory.
Then, install all tools and libraries needed on the host:
$ cd <SDK6_INSTALL_DIRECTORY>
$ ./poky/scripts/host-prepare.sh
Building kernel and file-system images
At this point, the environment has been setup and the build can be started:
$ source ./poky/fsl-setup-poky -m ls2085ardb
$ bitbake fsl-image-virt
Once the build is finished, generated images are available in tmp/deploy/images/ls2085ardb:
$ cd tmp/deploy/images/ls2085ardb
Since u-boot is the bootloader used on LS2085A-RDB, an uImage has to be generated from the kernel Image, produced by the build:
$ sudo apt-get install u-boot-tools
$ mkimage -A arm64 -O linux -T kernel -C none -a 0x80080000 -e 0x80080000 -d Image uImage
Last step of the build consists in embedding the uImage, and DTB in the file-system image:
$ mkdir filesystem
$ gunzip fsl-image-virt-ls2085ardb-<DATE>.rootfs.ext2.gz
$ sudo mount -o rw fsl-image-virt-ls2085ardb-<DATE>.rootfs.ext2 filesystem
$ sudo cp uImage filesystem/boot/
$ sudo cp Image-fsl-ls2085a-rdb.dtb filesystem/boot/fsl-ls2085a-rdb.dtb
$ sudo umount filesystem
Write filesystem on the LS2085A and boot
In this section the previously generated filesystem will be installed on the SATA drive which will be connected to the LS2085A platform.
Note
Virtual Open Systems is not responsible for any damage which might be caused to your platform while following the instructions below. While the content of this guide has been tested thoroughly, Virtual Open Systems cannot guarantee for any potential user errors which may harm the target platform.
Create partition on the LS2085A board SATA drive and install filesystem
A partition for the new image has be created. The SATA disk is plugged on the workstation machine during this process. The partitioning tool used is parted. At this stage the partition table should be edited on individual basis, according to the current SATA disk layout. It is recommended to allocate at least 10GB. Below the name of the drive is sda, it's likely to be different and need to be adapted. To create a partition where the filesystem will be written, run:
# parted
(parted) mkpart logical ext4 <START_POSITION> <END_POSITION>
(parted) print
Model: ATA KINGSTON SV300S3 (scsi)
Disk /dev/sda: 240GB
Sector size (logical/physical): 512B/512B
Partition Table: msdos
Disk Flags:

Number  Start   End     Size    Type      File system  Flags
1      1049kB  269MB   268MB   primary   fat16
2      269MB   43.2GB  42.9GB  primary   ext4
3      43.2GB  86.2GB  42.9GB  primary   ext4
4      86.2GB  240GB   154GB   extended
5      86.2GB  94.8GB  8590MB  logical   ext4
6      94.8GB  127GB   32.2GB  logical   ext4
7      127GB   170GB   42.9GB  logical   ext4
8      170GB   180GB   10.1GB  logical   ext4          lba
(parted) set 8 lba off
(parted) quit
The output of the print command in parted is a way to verify that the partition has been successfully created and to get its number. Still the kernel information about partitions must be refreshed:
# partprobe
Now that the partition is available on the disk, a filesystem has to be created:
# mkfs.ext4 -L SDK6-YOCTO /dev/sda<PARTITION_NUMBER>
Then, transfer the contents of the filesystem to the previously created partition. To copy the content run:
# mkdir /media/image
# mount fsl-image-virt-ls2085ardb-<DATE>.rootfs.ext2 /media/image
# mkdir /run/media/sda<PARTITION_NUMBER>
# mount /dev/sda<PARTITION_NUMBER> /run/media/sda<PARTITION_NUMBER>
# cp -ra /media/image/* /run/media/sda<PARTITION_NUMBER>/
# umount /media/image
# umount /run/media/sda<PARTITION_NUMBER>
Note that the filesystem written is not overriding the one created after the partitioning, but only the files are copied.
If the filesystem is directly copied to the partition with a tool like dd, the filesystem size will be reduced to under 400MB and then the partition will need to be re-sized.
Finally, plug the SATA drive on the LS2085A-RDB.
Establish serial link to the LS2085A board
Once the filesystem image has been created, the serial link must be correctly set to enable the communication between the workstation and the LS2085A board.
In order to establish serial communication with the LS2085A a software tool such as minicom must be installed on the workstation.
$ sudo apt-get install minicom
Then, to discover the UART port on the workstation run:
$ dmesg | grep ttyUSB
The following output will appear in response to this command:
[2316635.684250] usb 3-10: pl2303 converter now attached to ttyUSB0
This means the UART interface is connected to ttyUSB0. Next step is to configure the link in minicom, run:
$ sudo minicom -D /dev/ttyUSB0
Then the actual configuration is done by a menu:
Press Ctrl-A Z to open the Minicom menu
Press O (Minicom Configuration)
In the Configuration menu, select with the arrows key "Serial port setup"
Configure the UART as it follows:
+-----------------------------------------------------------------------+
| A -                            Serial port : /dev/ttyUSB0             |
| B -                      Lockfile location : /var/lock                |
| C -                         Callin Program :                          |
| D -                        Callout Program :                          |
| E -                           Bps/Par/Bits : 115200 8N1               |
| F -                  Hardware Flow Control : No                       |
| G -                  Software Flow Control : No                       |
|                                                                       |
|    Change which setting ?                                             |
+-----------------------------------------------------------------------+
Press "Enter" to save settings, then select "Exit" to quit the Minicom menu.
Login or register to access full information